Maintenance
 The primary issue with these machines is tobacco build-up on the bottom of the cutter (TOP calls it a tamper) and on the top/front of the chamber (viewed through the nozzle)
Even a light build-up on the cutter can (it depends on how tight the clearances are to start with) noticeably affect the 'feel' of the machine (without tobacco there is noticeable resistance when the cutter is 'cutting'). When it seems like the machine is having a hard time 'cutting' the tobacco, take the cutter out and clean it. Though some machines gunk up faster than others, odds are that if you have to do this frequently, your tobacco is probably too moist.
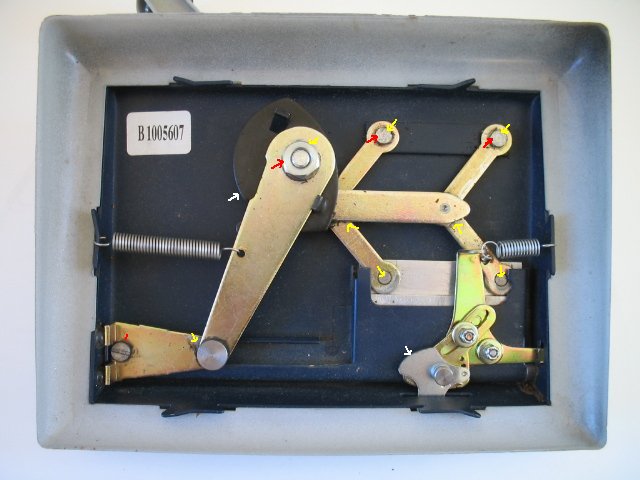
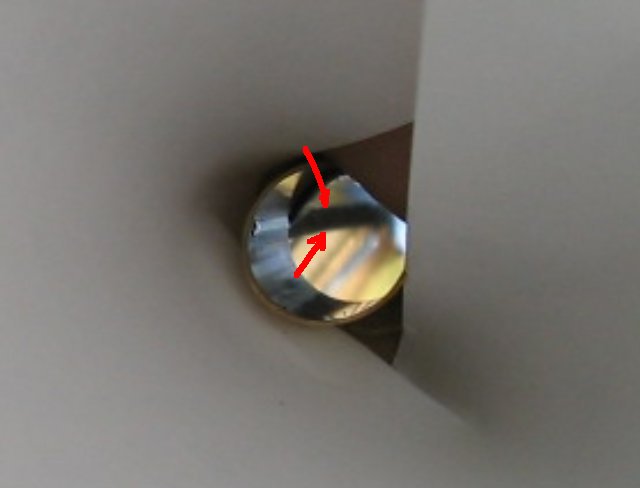
To remove the cutter you need to remove the three nuts marked (red arrows) in the picture. If the big nut on the cam won't come loose you can take the acorn nut off the handle instead. In this case you'll also have to take off the spoon mounting screw. Swing the top legs of the 'H' to the left and slide the linkage straight back, like this.
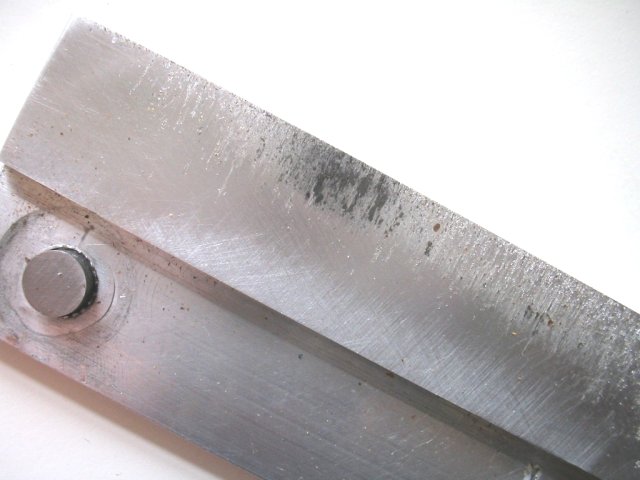
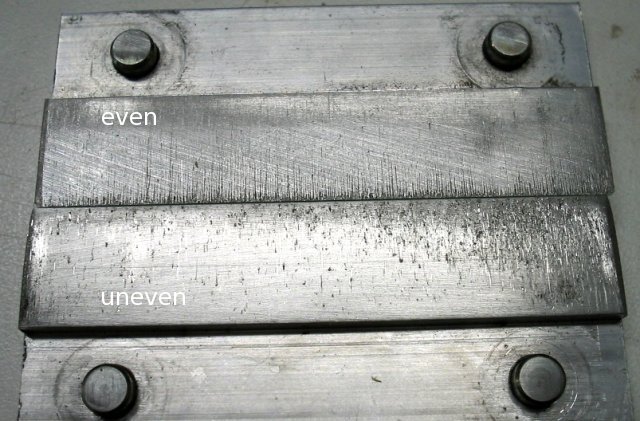
You can lightly sand the bottom of cutter (put a piece of 220-600 grit sandpaper on a flat surface and lay/slide the cutter on it). Sand just enough to remove any nibs, don't try to remove all the scratches. The scratches would just be back in a matter of days and have no impact on performance. Too much sanding will also increase the clearance between the cutter and the top/front of the tobacco chamber. If the scoring on the bottom of the cutter is not consistent from side to side, the cutter isn't mating well with the bottom of the tobacco chamber and you will need to clean the cutter fairly often.
In my experience, sharpening the cutter (Is it too late to start calling it 'the compressor'?) is a waste of time. Aluminum is worthless at holding an edge. A sharp/pointy edge will not last and it won't gain you anything. If the edge of your cutter is chewed up, lightly sanding the face (with the two edges sitting on the sandpaper) will give you a longer lasting edge (square like metal shears instead of pointy like scissors). A slight rounding of the 'cutting' edge is fine, its caused by the cutter bumping into the curving wall of the chamber.
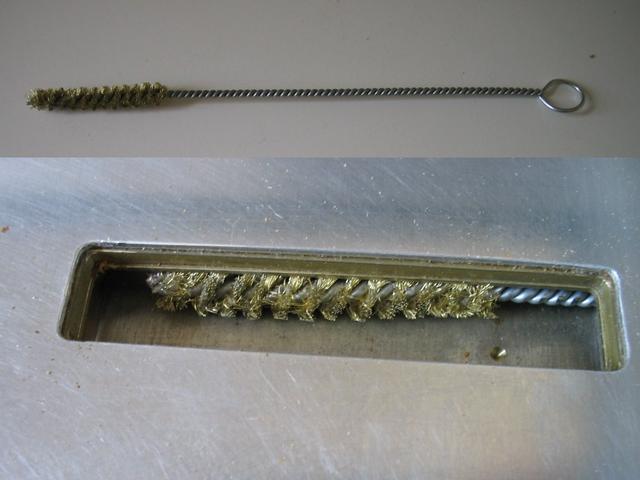
Another thing to check is the top/front of the tobacco chamber. Tobacco gunk is slower to build up here (Its hard to see. Look through the nozzle and move the machine around so that light reflects on that area. Removing the spoon helps a lot.) but can also severely impact performance. If you have any gunk buildup on top of the cutter, you have gunk buildup on the top/front of the tobacco chamber. It does take a bit of jockeying and twisting around but a 3/8" brass tube brush works well (...5/16" works better). With the brush at the edge of the opening and twisting it counterclockwise seems to work best. After you've used the brush a few times with the spoon removed it gets munched enough that you can use it with the spoon in place (i.e. easy maintenance cleaning without taking anything apart). In the past I've used a little homemade scraper.
Lubrication is good but has a minimal impact on performance (unless you are too lazy to clean the machine). After reassembly, you can use a bit of dry lube on the linkage joints (yellow arrows). Stay away from any kind of oil (tobacco will cling to it and it will do more harm than good), especially vegetable oil (which can turn into a gummy rancid mess when exposed to air for an extended period). While tobacco can cling to grease, its harmless and holds up better when used on sliding pressure points. Use a small bit of grease (I use a thick/dry white lithium grease) on the edges of the tube release and cam (white arrows) when the action feels a bit rough at the very end of the stroke (when the release rubs/engages).
![]()
Comments [ new ]
- Cleaning
- Posted by Melody on Wednesday, 18-Jul-2007
I have been rolling for a few years and found the best way to clean my TOP is with 91% alcohol. I takes the gummy residue that builds up with time off of the cutting box (metal) with a soft cloth saturated with the alcohol and I remove the rubber backing and I fill a small squeeze bottle w/ a very narrow nozzle w/ the alcohol and forcibly squirt between the metal contact sights and it washes all the powdery residue from the machine. Let the machine dry for a few minutes and your ready to roll with your machine responding like new. Will not rust anything either :)
[ reply | link ] to this. Go to [ topic | top ]
Be safe and prosperous! And thanks for all the good info.
- Liquid Wrench Dry Lubricant
- Posted by mike c on Thursday, 01-Mar-2007
My friend who oils her machine (my understanding is this is "politically correct") wanted to see my can of silicone spray......well, that was fine accept I dropped it and broke the nozzle beyond a rig job. At Home Depot today I found what they told me was a brand new "Liquid Wrench" Dry Lubricant spray, and what thrills me is that it has the tube (like WD-40) to direct chemicals exactly where you want them...he said this will be even better than the silicone spray as far as attracting anything (which it didn't)...and other than having to wipe excess off overshoots, I am hooked on what it does.....I realize it's controversial but I am excited for my next "pit stop" when needed........I also realize this may not be a new product to some of you (or many, etc).....It'll be getting carefully applied to compressor top, bottom, and chamber, just like the silicone,,,,,to me it's too great to pass on......arguments, complaints, know-mores, correctors, whoever is cordially invited to change my course of action if this is a true matter........
[ reply | link ] to this. Go to [ top ]
- Re: Liquid Wrench Dry Lubricant for Quisinarts
- Posted by Link Wray on Friday, 02-Mar-2007
I don't know that I'd wanna be lubein' the cutter or especially the chamber.... that stuff, wet or dry, is gonna end up in some amount in yr tobacco.
[ reply | link ] to this. Go to [ parent | top ]
- Re: Liquid Wrench Dry Lubricant for Crankers
- Posted by sneakin' back in if I can on Friday, 02-Mar-2007
The "overshots" were from the silicoone spray without the thin straw director.....I always wiped EVERYTHING un-needed perfectly clean (dispite if I was being excessive, etc)
[ reply | link ] to this. Go to [ parent | top ]
Just thought my post wasn't clear...overshots with the new stuff isn't worth a mention.......
mc
- Re: Liquid Wrench Dry Lubricant for Quisinart
- Posted by scott johnson on Saturday, 03-Mar-2007
I wonder if this is the same as the Remington Dry Lube I use for firearm maintenance. It goes on wet, drys extremely fast. Can't hurt to try it I suppose.
[ reply | link ] to this. Go to [ parent | top ]
sj
- Re: Liquid Wrench Dry Lubricant for Cuisinart
- Posted by Nobody Loves Me on Sunday, 04-Mar-2007
Dear Scott....this new lube, called "Liquid Wrench, High Performance Dry Lubricant" goes on so dry, I just can't see a problem there.....I was really liking the silicone spray, although no straw applicater..
[ reply | link ] to this. Go to [ parent | top ]
[snip]
- H-link tightening
- Posted by Scott Johnson on Sunday, 21-Jan-2007
I have noticed in the past month that my old red Supermatic is getting very sloppy. I decided today to pull the cutter out and clean it and inspect all parts for damage. I noticed that the H-link was really sloppy, so I set it on a piece of steel and drove the rivets in a little tighter. this tightened the feel on the links to near perfect.
[ reply | link ] to this. Go to [ top ]
While I had it apart, I also face-sanded the cutting edge like is mentioned above. The cutter now cuts better than it ever did with standard sharpening of each cutting edge.
The whole machine is smoother now, smokes are being made perfectly once more and I did not have to order a single part! I also noticed that my sticks are being packed much tighter than before I hammered the H-link rivets.
SJ
- Re: H-link tightening
- Posted by Dave L on Monday, 22-Jan-2007
I don't know about the red machines but the Blue and II rivets have shoulders and its a bit tricky to tighten them. Basically I use a vise and steel bushing to crown the heads, i.e. bend the perimeter of the head closer to the linkage. The rivets aren't soft and it takes a good amount of force to tighten them. The Top-O-Matic rivets are a joke in comparison. Because its so easy to deform/collapse/over-tighten them I'd recommend leaving them alone.
[ reply | link ] to this. Go to [ parent | top ]
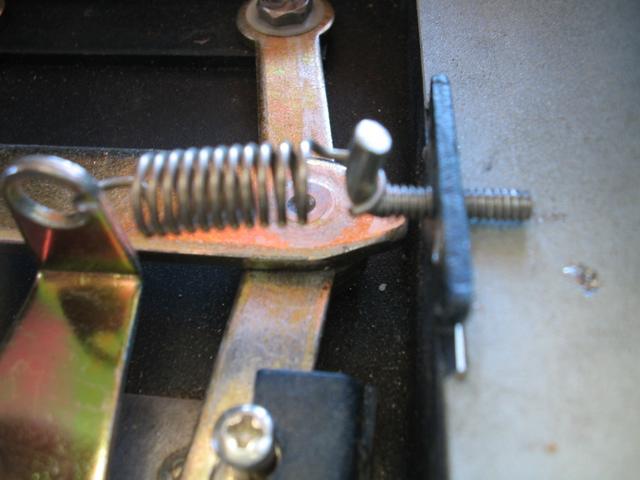
I also use real thin plastic washers between the mounting bolt heads and the linkage. You can see them and my first tightening attempt here. I had the bushing on the top side and when I saw how the top of the 'H' arm deformed (filed almost flat in the image, under the spring, hard to see) I realized there had to be a shoulder on the back side. For me the factory clearances/looseness (not wear and tear) just bugged me and I didn't notice a change in function.
- Re: H-link tightening
- Posted by scott johnson on Monday, 22-Jan-2007
Dave, what I did was drive the rivets in tighter. looks like the same rivets as in your picture. I am planning on taking the h-link to my buddies shop and have him "re-ping" the other side to swell them out a little more so they won't slide back and loosen up.gonna see if he has any ideas for making the machine better also. he's a retired ?metalsmith? or something like that.
[ reply | link ] to this. Go to [ parent | top ]
sj
- Re: H-link tightening
- Posted by Dave L on Monday, 22-Jan-2007
The rivets on my Supermatics have three diameters, the smallest is where they go through the crossarm of the 'H' (the biggest is the head). The shoulder I was talking about rests on the crossarm, i.e. the rivets have a bigger diameter where they go through the legs (4 short pieces) of the 'H'. Hammering the heads might deform them but they cannot move/go anywhere (you cannot 'drive them in') because of the shoulder. Since there's a shoulder, all you need is a center punch to tighten ("re-ping") them.
[ reply | link ] to this. Go to [ parent | top ]
- Re: H-link tightening
- Posted by Dave L on Monday, 22-Jan-2007
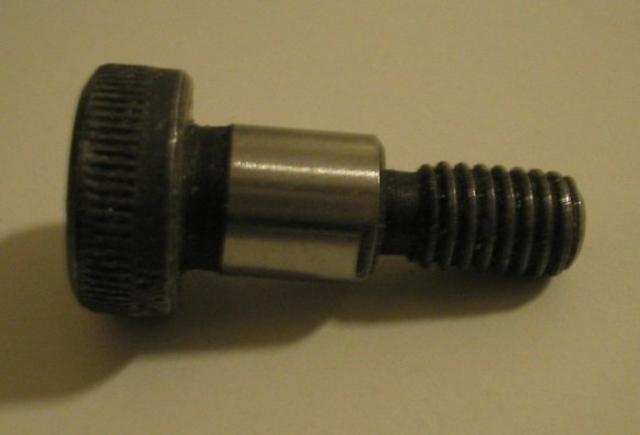
[ reply | link ] to this. Go to [ parent | top ] The closest visual I have is a shoulder screw.
- Re: H-link tightening
- Posted by scott johnson on Monday, 22-Jan-2007
AH! I understand. I'll try what you have done and see how that works. My friend has all those center punches and a press I'll either fix it, or be ordering a new H-link. :)
[ reply | link ] to this. Go to [ parent | top ]
- Re: H-link tightening
- Posted by scott johnson on Wednesday, 24-Jan-2007
Dave, now that I've sharpened the cutter like in your Supermatic maintenance section, It's doing so much better that I'm making perfect sticks on the king size setting. Even with tubes with 15mm filters. I can use Vera Cruz tubes with the size selector to the far right. I couldn't do that before. Going to try to find some nylon screws and try the cutter mod next. Or I might cut a groove across the bottom of the cutter and fill it in with some JB weld and make a "bumped line" across the bottom.
[ reply | link ] to this. Go to [ parent | top ]
- Re: H-link tightening
- Posted by Dave L on Thursday, 25-Jan-2007
I wouldn't have expected that noticeable of a change but I'm glad its working out. Send me a SASE if you cannot find nylon setscrews.
[ reply | link ] to this. Go to [ parent | top ]
- Re: H-link tightening
- Posted by scott johnson on Saturday, 10-Feb-2007
I took the old H-link out of my bag-o-parts and worked on it some more. I put it on a piece of steel and hammered the rivets. Then I used a bench grinder to dress them up.
[ reply | link ] to this. Go to [ parent | top ]
I reinstalled the old H-link back into my machine and put the new one away. My machine works a lot smother with the older H-link. The new model just isn't made for the old machine. Too much grinding and rework needed to make it work.
sj
- metal-on-metal (please restore my insanity)
- Posted by mike c on Sunday, 21-Jan-2007
this morning I was just shining up my machine after stuffing a few, had decided to clean under the cutter with a non-metallic probe. I had a little alcohol in there and cycled the mechanism, and I'll be damned if I didn't get a metallic scratch on the chamber floor. (there was NO probe during cycle) I can't understand how this occured/takes place...I am imagining most of you don't bother with such a thing as it's normal, right?? right??
[ reply | link ] to this. Go to [ top ]
also, someone please tell me how you know when you NEED a new cutter, as I wish to know. (with metal, obviously)
- Re: metal-on-metal (please restore my insanity)
- Posted by Wazmo Nariz on Sunday, 21-Jan-2007
To tell you the truth, the two year-old cutter I took out of my machine is still fine and still works. I was never one to sand the thing unnecessarily to clean it or remove light pits and scratches, however...I'd just clean the gunk off with soapy water and dry the thing before re-installing. I think I only gave it a light sanding once in all that time, after about a year. I would imagine under normal usage/care it should last for years.
[ reply | link ] to this. Go to [ parent | top ]
If you're gonna clean under the cutter, you really need to take it out, which is a very easy process.
The only reason I ordered a new one was becasue I hated to pay more for shipping than the parts I was ordering from Arbro Inc., so threw a cutter into the order. That said, I'm glad I did because so far the new cutter has performed marvelously. Towards the end of this week I'll take it out for an inspection to see how it's holding up.
- Re: metal-on-metal (please restore my insanity)
- Posted by Dave L on Sunday, 21-Jan-2007
Aluminum and steel don't get along very well, chamber and cutter scratching is to be expected. Its surprising that it took so long for the plastic cutter/compressor to show up.
[ reply | link ] to this. Go to [ parent | top ]
- Premier cleaning
- Posted by Tim Aydt on Thursday, 11-Jan-2007
After extolling the virtues of the Premier Supermatic, I will now grouse about it. My supermatic had acquired several disgusting globs from being negligently left out on the kitchen table and counter. Icing, butter, etc. Although it was performing fine, I decided that it was time to give it a good cleaning.
[ reply | link ] to this. Go to [ top ]
After looking back through the posts below, I see that the last time I had cleaned it was in July of 2005.
So, I took it apart, cleaned it completely and reassembled it. Now, it's not making smokes worth a crap. LOL Oh, it makes king's just fine, but my 100's all have a gap between the filter and tobacco.
I guess I will have to wait for it to gunk up a little before it starts making good 100's again.
The lesson here is: If it ain't broke, don't fix it.
I don't use any lubrication and it worked for over a year and a half without any problems.
- Re: Premier cleaning
- Posted by Dave L on Sunday, 21-Jan-2007
Gunk (or lack thereof) doesn't affect the gripper/release timing, i.e. cause gaps. A year and a half and cleaning it didn't give you a smoother/easier running machine??
[ reply | link ] to this. Go to [ parent | top ]
- Re: Premier cleaning
- Posted by Tim Aydt on Sunday, 21-Jan-2007
Actually no, the mechanical functioning was nearly perfect. I believe difference was caused by the fact that there was a 3/16 inch plug of tobacco on the spoon at the crimp. I cleaned that off and now it's not pushing the tobacco as far as before. I also flipped the gripper to the unworn side and now it tearing tubes.
[ reply | link ] to this. Go to [ parent | top ]
- Re: Premier cleaning
- Posted by Dave L on Sunday, 21-Jan-2007
Sounds like it was the gripper to me, flipping it gave you better grip. That its ripping tubes means the release timing is a bit too late. Because the worn side allowed tubes to slip more, the late release was a non issue.
[ reply | link ] to this. Go to [ parent | top ]
- Pam works for me
- Posted by Jo on Wednesday, 22-Feb-2006
I tried Pam spray to keep the friction down since it was the only thing in the house at the time. It works very well for me. The tobacco doesn't stick to it like you would think. The first pack I stuffed had a few oily looking spots, but other than that it is still working for me 5 weeks later.
[ reply | link ] to this. Go to [ top ]
I haven't tried it, but I think it would probably be better to spray a qtip with Pam and use it to coat the spoon & packing area to avoid the oily spots. Or use a qtip to wipe the spoon area after spraying to absorb excess.
- What to use to oil tube injectors
- Posted by Tim S. on Monday, 10-Oct-2005
I took my new supermatic blue apart, it was pretty easy really. I sanded alot of the parts with 240 grit sand papper, did the arm change and put s few shots of pan cooking oil on it.
[ reply | link ] to this. Go to [ top ]
I was going to put high temp bearing grease on it, but thought it may not be the best thing to use with tobacco. So I'm wondering what, others use to oil their ???
- Re: What to use to oil tube injectors
- Posted by Zippy: on Tuesday, 11-Oct-2005
I wouldn't use any grease. The loose tobacco (shake) will mix with it and defeat the entire purpose.
[ reply | link ] to this. Go to [ top ]
There are some silicone spray products that dry completely, but I would not use it on the cutter/packer or anything having to do with the spoon injector.
In my humble opinion, smoothing the none cutting surface of the cutter/packer with extra fine sandpaper, then buffing same with extra fine steel wool will do just as much as lubricant.
- Re: What to use to oil tube injectors
- Posted by Kev on Tuesday, 11-Oct-2005
I don't use anything on the parts that come in contact with tobacco since any lube will cause gunking. I use silicone spray on the mechanical parts underneath.
[ reply | link ] to this. Go to [ top ]
- Re: What to use to oil tube injectors
- Posted by Matt on Saturday, 15-Oct-2005
Others here will tell you and so can I that Goo Gone works great. I first applied it to my blue Supermatic about a month ago, and could see how well it was still working when I took it apart today. Another idea you might try is plain old pencil lead. I haven't tried a really soft lead like 5 or 6b, but I think that #2 graphite just drawn onto contact surfaces does make a noticeable difference.
[ reply | link ] to this. Go to [ top ]
- Re: What to use to oil tube injectors
- Posted by Rob S on Saturday, 11-Aug-2007
I have a small container of graphite, called guitar grease, that I bought for the nut slots on my acoustic guitar. I applied just a very small amount to some of the pivot points on the mechanisms. Works great so far.
[ reply | link ] to this. Go to [ parent | OP | topic | top ]
- Re: What to use to oil tube injectors
- Posted by mike c on Sunday, 12-Aug-2007
here is the answer....once your mahines break you in as welll as you they, absolutely NO lubricant in needed. period. However, if you have a metal/aluminum cutter, some fun can be had by usung a few small shots of heavy duty silicone spray (get it with the tube-extension), and there are other things can be used as well, maybe soembody will add on here:
[ reply | link ] to this. Go to [ parent | OP | topic | top ]
but the main truth is this NONE!!!! (and you can spray it on linkage, etc, before you stop)
- Re: What to use to oil tube injectors
- Posted by james on Thursday, 16-Aug-2007
I clean my machine about every other month. I completely disassemble it, clean it with alcohol and lubricate it lightly with olive oil. As long as you don't use powdery tobacco, bi-monthy maintainencs is more than adaquiate. Do you want to smoke silicon oil? I cook alot and don't mind breathing a little olive oil.
[ reply | link ] to this. Go to [ parent | OP | topic | top ]
- Re: What to use to oil tube injectors
- Posted by mike c on Thursday, 16-Aug-2007
well, me personally, am fearless of inhaling just about anything, but you'd be correct that silicone isn't a great choice, however such a tiny amount is needed (if used) and it doesn't alter the tobacco flavor,,,,BBBBBBUTTT,
[ reply | link ] to this. Go to [ parent | OP | topic | top ]
if I must stand corrected then how about this reply:
official word from Arbro Inc, authorized service center for RBA and the Supermatic: use only a tiny bit of regular oil. I state again, lubrication is not needed, it is simply a tendency to want to do it.
- Re: Supermatic
- Posted by Denny on Tuesday, 11-Oct-2005
Hi although I am fairly new to the Stuff Your Own market I have run into many of the similar troubles that a lot of people have with the Supermatic. Here are some of my maintenance remedies that I have acquired since owning my machine.
[ reply | link ] to this. Go to [ top ]
First off most problems are usually with the cutter/compression bar, or the loading spoon. I have done what many newbies done, as far as oiling the machine at the strategic points, only to find that the oil only complicates the original problems.
Because the tobacco dust/shake tends to locate itself in tight tolerance spaces, it is wise not to lubricate these areas. So then what do you do? Well when my machine starts to get gunk-ed up, I take off the bottom pad, and soak my machine in the kitchen sink with plain hot water, (don't use detergent, just hot water) I then carefully work the mechanism of the machine while it is submerged. This gets out all the loose tobacco which clog's up the machine.I then take the machine out of the sink, and throughly dry either with a towel,or hair dryer. I would highly recommend that you keep your machine oil/grease free! If your spoon is either hanging up, or not moving smoothly, you might want to consider smoothing the spoon channel with a very fine sand paper, or steel wool.
This brings us to the cutter/ compressor bar. I took my bar out, and used 4 ought steel wool, and polished the entire bar. If I load a lot of smokes, I usually polish the cutter edge to keep it polished (no need to take out the cutter bar). Remember to use a very fine grade of steel wool as the aluminum is very soft, and a coarse grade will only make your cutter gather more gunk, and not less. As someone stated before, CTC really should make this cutter out of a better material, such as brass, or stainless steel. Oh yea one other thing, you should occasionally polish the inside and outside of your tube nozzle, and the metal spoon with the 4 ought steel wool. This method seem to work the best for me.
- Re: Supermatic II cleaning
- Posted by Mary on Friday, 05-Aug-2005
Can anyone tell me how to clean and lubricate my Supermatic II and about how ofter this needs done?
[ reply | link ] to this. Go to [ top ]
I am new to SYO but will never go back to buying cigarettes. Besides the savings I enjoy my SYO more.
- Re: Supermatic II cleaning
- Posted by Tim Aydt on Friday, 05-Aug-2005
First, learn how to take it apart and put it back together. The cutter is the part most prone to having problems when it is dirty. Tobacco has a tendency to gum up the bottom of the cutter, this needs cleaned off. The cutter may often get scuffed, either on the top, bottom, or blades. I use an emory board to smooth these down and sharpen the blade.
[ reply | link ] to this. Go to [ top ]
I usually clean everything with q-tips and lighter fluid, and then reassemble. If you want to oil it, use the oil sparingly. Oil attracts powdery tobacco and will cause it to gum up quicker. Others advise using silicone spray. I don't lubricate mine very often.
As for, how often to clean it? As often as it needs. I know that is a sucky answer, but it really varies per user. I haven't cleaned my Supermatic II since I first got it four months ago. I cleaned my Premier three weeks ago. That was an elapsed time of seven months since my last cleaning.
- Re: Supermatic II cleaning
- Posted by Kev on Friday, 05-Aug-2005
I think it depends on the machine too. My original Super II required cleaning about every 6 packs. My new one (a few months old) hasn't been cleaned yet. Personally, I think the fit tolerances in the tobacco chamber/cutter vary from machine to machine.
[ reply | link ] to this. Go to [ top ]
- Re: Supermatic II cleaning
- Posted by Dave L on Saturday, 06-Aug-2005
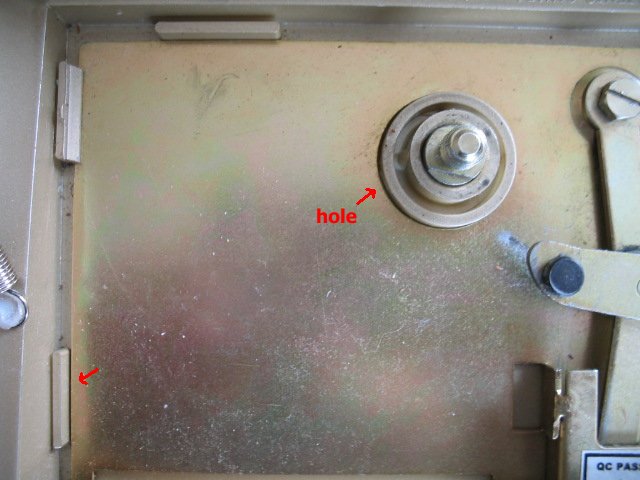
I tend to agree with you. I am curious about the potential differences in your machines. When you turn your machines upside down, is there a difference in spacing between the metal plate and plastic tab that sticks up between the end of the main spring the end of the spoon? Does the cranks plastic bushing (under the cam) come through a plain (flat) hole or a flanged/lipped hole? Looking at the side of the cutter housing, how tight/parallel is the gap between the housing and main plate? If there are differences, which is the 'better' machine? Thanks.
[ reply | link ] to this. Go to [ top ]
- Re: Supermatic II cleaning
- Posted by Tim Aydt on Saturday, 03-Sep-2005
Dave, can you explain this better I'm just not getting it?
[ reply | link ] to this. Go to [ top ]
"is there a difference in spacing between the metal plate and plastic tab that sticks up between the end of the main spring the end of the spoon?"
And, is the flanged/lipped hole on the top of the machine or on the underneath side?
"Does the cranks plastic bushing (under the cam) come through a plain (flat) hole or a flanged/lipped hole?"
- Re: Supermatic II cleaning
- Posted by Dave L on Sunday, 04-Sep-2005
My machine with a flanged hole has a larger gap, between the plate and the locating tab, than my flangeless machine. A large gap equals linkage binding because the metal plate isn't properly located relative to the plastic housing. I'm wondering how consistent the II's are, if all flanged hole machines have a large gap/linkage binding.
[ reply | link ] to this. Go to [ top ]
[snipped]
- Re: Supermatic II cleaning
- Posted by Tim Aydt on Sunday, 04-Sep-2005
Keep in mind that my Supermatic II is one of the old brown ones.
[ reply | link ] to this. Go to [ top ]
It is flangeless and is fitted fairly tightly. I can barely get a business card in the gap between the plate and the locating tab.
I did notice that the cam had a flattened spot right before the transition point, where the metal has curled up a bit and at the point where the linkage contacts the machine body, there is a small rubber disk to absorb the impact.
I just checked the cutter carriage on all three machines I have at the house and the Supermatic II and my blue Premier both have a gap similar to your Premier. My vintage Premier has a parallel cutter carriage. All three have very tight tolerances between the cutter and the carriage. One thing I did note that I hadn't before, is that the spoon guide on my vintage Premier is not curved, but flat like the Supermatic II. I'm sure this is why the spoon that wouldn't work in my blue Premier when I bought it, works fine in the vintage Premier.
I have never noticed any linkage binding on the Supermatic II. My wife uses it the most and finds it easier for her than the Premier Supermatic, so I doubt if she has experienced any problems. I have a feeling that I would break it if I used it on a daily basis. I'm not very gentle.
- Re: Supermatic II cleaning
- Posted by Warren on Friday, 05-Aug-2005
After trying various oils and silicon greases, I found that tobaco sticks to those surfaces even more, making the machine (Suprematic Premier) perform worse after the brief initial improvement. Finally my wife suggested Goo Gone and that works perfectly. It is a generic glue & gunk remover. I apply it very sparingly (with q-tips) then wipe it out. This leaves the surface non-sticky and slightly slippery, allowing removal of tobacco by just blowing at it (quite unlike the oiled surfaces ).
[ reply | link ] to this. Go to [ top ]
I started using it first on the plastic slider (at the back end of the tobacco spoon) and its metal shaft. That worked great, so I expanded its use to all other moving contact points. The next greatest positive effect (after the plastic slider, which was the main gunking problem) was for the top and bottom surfaces of the cutter blades. See the earlier thread "Librication & Cleanup" for more details: [link]
Another tip for the basic cleanup is not to shake/blow off the tobacco with the machine "belly up" until you remove the rubber bottom. Namely the tobacco will gather on the rubber bottom and fall into the mechanism if you turn the machine belly up. I first remove the bottom, brush it off (with a paper tissue), then blow few times from below into the mechanism and that does the inside. Then I flip it belly up and blow off the top surface (which is now at the bottom).
I have taped a little box (plasticized cardboard) on the top to hold couple packs of tobacco close to the chamber, so that needs a bit more cleanup (just brushing off with a tissue) than the plain top surface. Dave, the host of this site, has built a professional quality "hopper tray" for this purpose: [link].
I had also taped all the gaps on the chassis through which the tobacco can fall into the machinery. I don't know why the designer had left at least half a dozen gratuitous gaps around the base. In any case, they're now all shut.
At present, the Suprematic machines are the best stuffers available. But they are far from optimized designs in many ways. I am hoping that the growth of the SYO (fueled by the merciless robbery of smokers by the unholy quintet of greedy bureaucratic parasites, slimy lawyers, back stabbing big tobacco, snake oil peddlers from the "health" racket and sneaky pharmaceuticals pushing their own nicotine, cheered on by the anti-tobacco yappers from their do-gooder fronts and from the bribed mass media lapdogs) will bring in some talented mechanical engineers to come up with much better machines. The most time consuming part is filling the tobacco chamber. The tray helps here quite a bit (and it should be a default part of the machine), but it still requires manual separation and stuffing of the chamber. That at least ought to be doable automatically. After that, the mounting of the tube onto the nozzle (especially time consuming for nonfiltered tubes) might be solved via some tube spools, where the rolled up tube gets pulled onto the nozzle, stuffed and cut automatically. One to two seconds per stick would be fine with me.
- Re: Supermatic II cleaning
- Posted by Dave L on Saturday, 06-Aug-2005
Like Tim says, the primary issue is tobacco buildup on the bottom of the cutter. When the first stage of the action (where the cutter moves) gets too stiff, take the cutter out and clean it.
[ reply | link ] to this. Go to [ top ]
Lubrication is overrated and not particularly important. Any significant changes resulting from lubrication are symptomatic of other issues (e.g. linkage binding and cutter clearance). Use a small bit of grease on the edges of the tube release and cam (grease lasts longer on sliding pressure points) when the action feels a bit rough at the very end of the stroke (when the release engages). After cleaning the cutter use a bit of dry lube on the linkage joints. Stay away from any kind of oil (tobacco will cling to it and it will do more harm than good), especially vegetable oil (which turns to a gummy mess when exposed to air for an extended period).
- Re: Supermatic II cleaning
- Posted by Mary on Saturday, 06-Aug-2005
"After cleaning the cutter use a bit of dry lube on the linkage joints."
[ reply | link ] to this. Go to [ top ]
Can you explain what dry lube is?
- Re: Supermatic II cleaning
- Posted by Dave L on Saturday, 06-Aug-2005
The lubricants description will include the word dry (and phrases like 'resists oil and dust buildup'). They are typically applied as a liquid (which makes it easier to apply than something like graphite powder), the liquid evaporates. The Dri Slide (with needle applicator) mentioned in another thread sounds good (I use LPS 1, drained from a busted aerosol can, with a needle applicator).
[ reply | link ] to this. Go to [ top ]
- Re: Supermatic Premier
- Posted by Rod on Tuesday, 15-Feb-2005
My Supermatic Premier machine is less then a week old and I have a serious problem. The tube will not stay on the nozzle. Have to hold the tube against the nozzle for the machine to work? anybody know how to fix this? The machine was working perfectly, I experienced no problems, then this problem happened and the machine has not worked properly since.
[ reply | link ] to this. Go to [ top ]
- Re: Supermatic Premier
- Posted by Rod on Tuesday, 15-Feb-2005
Never mind, I think I figured this out. Evidently you have to pinch the little black lever against the tupe as you crank. Amazingly, I did a couple cartons without doing this without a problem. Guess the machine loosened up.
[ reply | link ] to this. Go to [ top ]
- Re: Supermatic Premier
- Posted by Dave L on Tuesday, 15-Feb-2005
You shouldn't have to touch the tube gripper. Is the small spring in place? If it is, you probably need to loosen the grippers pivot nut a wee tad.
[ reply | link ] to this. Go to [ top ]
- Re: Supermatic Premier
- Posted by Runs with Scissors on Sunday, 08-May-2005
Roll Your Own Magazine has some videos that show the mechanics of the tube holder and how to adjust it.
[ reply | link ] to this. Go to [ top ]
< http://www.ryomagazine.com/multimedia/ >
Basically, there are two small hex nuts that could be the problem. One tightens the axis of the tube holder and the other adjusts the timing of the tube release by the angle of an adjustable cam arm (second hex nut).
You'll see these when you flip your Supermatic over with the rubber base removed.
I suspect the hex nut at the axis of the tube release is loose (or maybe tight)or the cam arm is striking too early.
Adjust the angle where the cam contacts the crank at the furthest possible point for King Size and where it doesn't strike at all for 100's.
It is not uncommon to have to tweak Supermatics a bit to get them working properly. Besides, you'll need to learn how to disassemble it to clean it good.
The mechanics are pretty straightforward-just remember where everything goes.
Bill
- Lubrication & Cleanup
- Posted by Warren on Monday, 25-Jul-2005
Here are couple tips on cleanup and lubrication which made my Suprematic Premier slide smoothly as I have never seen it before:
[ reply | link ] to this. Go to [ top ]
1) The tobacco spoon has a plastic slider at the back end which slides along the metal guides (I think this was a bad choice of materials to pick to slide on each other). This slider and guides seem to gunk up quite often, making the spoon movement hard, especially in the initial phase of the slide and on the return (failure to snap back). I tried oiling it (using variety of oils, from peanut oil to sawing machine oil), which helps a bit but it makes cigettes smell like burned french fries, and also didn't last long since oil makes more tobacco stick to the slider and along the guides. I tried dripping alcohol along the guides and under the slider, which does help, but doesn't last beyond couple packs. Finally I tried Goo Gone, an oily non-toxic glue and gunk remover (with a mild lemon smell and no visible residue or grease left after evaporation, which takes few minutes):
http://www.magicamerican.com/googone.shtml
It is available in most supermarkets and hardware stores. I poured few drops of Goo Gone along the slider guides and under the slider as I ran the slider few times back and forth. The slider has never moved so smoothly, not even when I got the machine first. A carton later and it is still as smooth as ever. A very mild lemon smell evaporates completely within hours of the lubrication and doesn't seem to reach cigarettes even right after the application. The Goo Gone evaporates, thus it doesn't spread into the tobacco chamber or gather any tobacco (as oil would do).
2) The cutter is another part gunking up often, especially with the moist or fine cut or powdery tobacco. When dirty it creates extra friction right before the cutter is to move. I thought for a while the friction was coming from the pair of "knees" of the linkage pushing the cutter (part S-58), as if the resistance came exactly as the "knees" where changing from the left bend to the right bend. But lubrication of the "knees" didn't help noticably. Cleanup of the top blade of the cutter did seem to help some (scraping the top blade edge with a screwdriver, with cutter extended nearly maximally so the screwdriver can't damage the sharp edge of the blade). Still there was a "knee" friction left. Finally I found that if I pour few drops of alcohol at the bottom of the tobacco chamber so it flows under the cutter (as I slide the cutter back and forth and tild the unit a bit, with front part up), and also at the top surface of the cutter, so the alcohol enters between the chassis and the cutter, on the top and the bottom surface of the cutter, the gunk clears out and the movement is very smooth again. Note that after pouring alcohol and sliding the cutter back and forth, the wet tobacco gunk will dirty the floor of the tobacco chamber and the back part of the slider. I used q-tips and tissue to rub the dirt out. The cleanup seems to last 5-6 packs.
- Re: Lubrication & Cleanup
- Posted by Dave L on Monday, 25-Jul-2005
1) Plastic to metal has almost no friction. I've had no problems with the spoon guide and wonder if your issues have more to do with Spoon Clearance.
[ reply | link ] to this. Go to [ top ]
Over time you may get a spot or two of buildup in the valley of the spoon guide. Remove the spoon and clean the spoon and guide. A cloth, suitable brush or maybe a gun barrel cleaner and a bit of alcohol will remove any buildup. If you leave the spoon in you will need to pour the alcohol through the guide while working the action (dripping a bit in will just spread gunk around). Odds are that any lubrication here will do more harm than good. I'd bet the main thing the Goo Gone did was to remove the mess resulting from lubrication.
2) Pouring alcohol into the chamber and working the action is a good idea for removing cutter gunk without taking the machine apart (just keep away from sparks).
When you clean the cutter top you also have to clean the opposing face of the scissors. A suitable brush (my valve guide brush is too big) or something like this are a couple of possibilities.
While the knee resistance you mention can be a gunked up cutter, it can also be Linkage Binding.
- Re: Lubrication & Cleanup
- Posted by Warren on Monday, 25-Jul-2005
> Plastic to metal has almost no friction.
[ reply | link ] to this. Go to [ top ]
I think it is the black paint inside the metal guides which causes friction when dirty. I noticed that q-tip blackens when scrubbed against the guides. They also have black paint on the cutter itself (in the u-space between the upper and the lower blades) and betweeen the cutter guides. The paint between the blades was leaving residue on the tobacco (i tested it with cotton and I could see it blacken), so I took the cutter out and sanded off the paint which touches tobacco. Also, if I wipe the spoon with a tissue (holding it with a tissue as it withdraws through the nozzle), I can see sometimes the black paint residue where the two edges of the spoon swiped the tissue or even in the back of the spoon (which doesn't touch tobacco, but slides against the spoon guide). So the paint must be wearing out bit by bit during machine use, flaking into the tobacco.
They should have kept the paint away from the tobacco areas or any moving contacts surfaces. While I don't buy any of the tobacco-haters propaganda (which is largely a distraction to help their sticky fingers into our wallets), I do think that smoking paints may not be good for your health.
In any case, the two procedures I described seem to help machine operate smoothly much more than any other cleanups or lubrications I tried earlier during about the dozen cartons I made so far since I started stuffing my own cigarettes. It works better now than out of the box. (The Excel machine doesn't work at all with non-filtered tubes, so I am stuck with the Suprematic.)
Do you know whether the new CTC owners plan any improvements and new designs? It would be a pitty if the machine gets orphaned. With all the escalating ripoffs and extortions of smokers by the state and federal bureaucracies, the SYO is bound to grow rapidly.
- Re: Lubrication & Cleanup
- Posted by Frank on Friday, 05-Aug-2005
I don't have my blue supermatic handy right now, but I only remember the black coating appearing on the u-space between the upper and the lower blades of the cutter. This coating is most likely teflon to prevent tobacco from sticking to the metal cutter. It may not be a good idea to remove it.
[ reply | link ] to this. Go to [ top ]
CTC probably wouldn't bother to just spray paint on this small surface for no advantage.
While this aluminum piece is referred to as a cutter, I don't think it really cuts anything. The blades are not really sharp even when new. A more proper name would be a compressor.
- Re: Lubrication & Cleanup
- Posted by Warren on Friday, 05-Aug-2005
> I only remember the black coating appearing on the u-space
[ reply | link ] to this. Go to [ top ]
> between the upper and the lower blades of the cutter.
That's the one I was talking about.
> This coating is most likely teflon to prevent tobacco
> from sticking to the metal cutter. It may not be a
> good idea to remove it.
Well, it does flake and I didn't want it, whatever it is, in the tobacco. So I scraped it all off. It seems to be just a black paint. I didn't see any sticking on that part of the blade at all, only on the top and bottom surfaces. I applied a small amount of "Goo Gone" onto these surfaces with a q-tip, then wiped it off thouroughly with a tissue, and it seems to keep the surfaces non-sticky many packs later.
- Re: Supermatic Premier
- Posted by Tim Mc. on Friday, 06-Feb-2004
Generally speaking I rise out of bed every morning and thank my lucky stars I live in a country that makes such a product as the Supermatic. It's a great device.
[ reply | link ] to this. Go to [ top ]
I would love to hear any comments one might have on how they clean the build-up off the top of the cutter without bending it to much. A natural solvent? A razor blade? Ideas are welcome as I have not found the pefect method beyond drying out every tobacco I get. And frankly, I know that's what the instructions say to do, but its not realistic for all different kinds of tobacco. For me, I like some moister than others. E.G. Drum I like dried as its way to wet and Black Death (even the halfzware) I like moist as its much too harsh and hot dried.
- Re: Supermatic cleaning
- Posted by Dave L on Tuesday, 10-Feb-2004
Buildup can be caused by too moist a tobacco (typically) or a worn and/or loose cutter. Over time the cutter will round a bit. Typically this is not a big deal. In your case a replacement cutter might be in order.
[ reply | link ] to this. Go to [ top ]
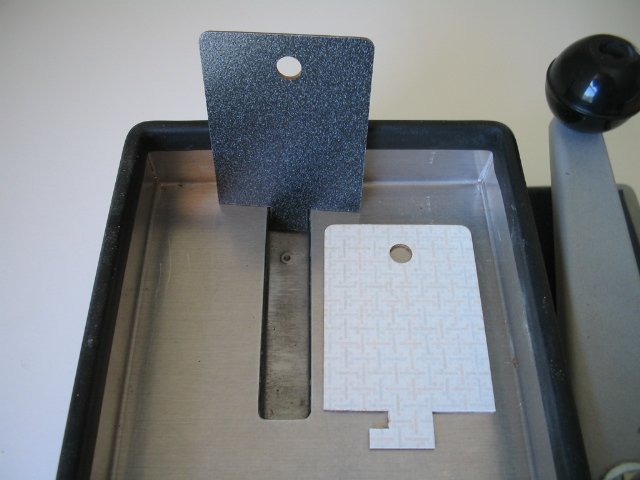
For cleaning I would keep steel (razor blade) away from the soft aluminum cutter. Denatured alcohol is the only solvent I would consider (cellulose base/no chemical nasties and leaves no residues). I'd give laminate a try. Places like Home Depot have sample racks. Use a hacksaw to notch the sample into a fat topped T with the base of the T sized to the slot width.
- Re: Supermatic cleaning
- Posted by Dave L on Saturday, 28-May-2005
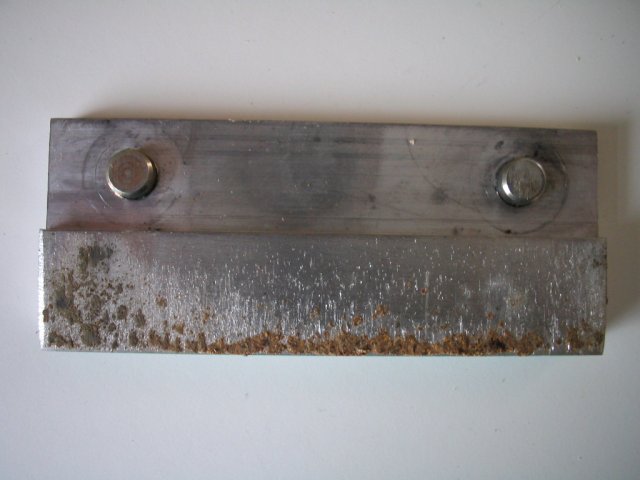
I've been gumming up my old Supermatic (cause is probably both the above) and decided to try the laminate idea. Something I realized it that cleaning the cutter top is like cleaning one blade on a pair of scissors. I made laminate scrapers for cleaning the cutter top and the tobacco chamber mating surface.
[ reply | link ] to this. Go to [ top ]
- DRI SLIDE Source
- Posted by Kurt Wall on Monday, 24-May-2004
I found DRI SLIDE available from the manufacturer's Web site:
[ reply | link ] to this. Go to [ top ]
http://www.russack.com/order_drislide.htm
$6.95 for a 4-ounce can, plus $4.00 for shipping and handling.
For another $1.00, you can order 4-ounce plastic bottle with an applicator needle, which might be more appropriate for lubricating the Supermatics.
Kurt
- Re: Supermatic Premier
- Posted by Tim_Mc on Monday, 24-May-2004
Thanks for the tips, both of you guys. I might try the dri-lube stuff. I took a quick look at a few sites on the dominant compounds in such lubricators and even the MoS2 compound (molybdenum disulfide) is totally non-toxic. It could be the best overall solution for taking care of my Premier.
[ reply | link ] to this. Go to [ top ]
And just for the record, I realized that CTC who makes the Premier is a Canadian company through and through! So I can say that I must thank my luck stars I am neighbors with a Country that makes such a product as the Premier! (that whole Plattsburg, NY plant had me screwed up in my defense).