Tuning
Functional tweaks, fixes and adjustments. Of primary importance (making a smoke with no filter end void) are the gripper and release timing.
![]()
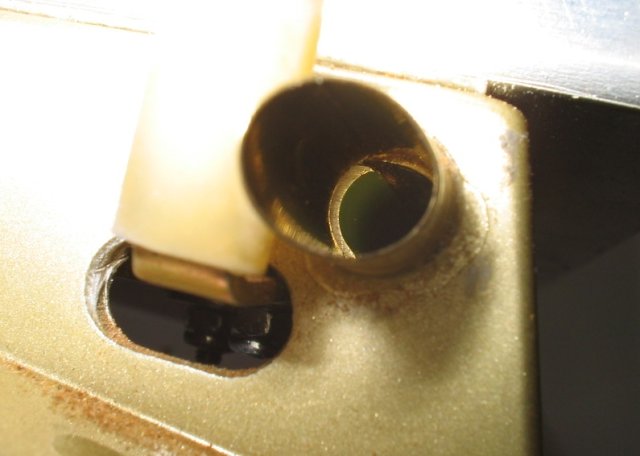
Cutter Face Clearance
After checking for linkage binding (which can also solve clearance issues) test the machines action without the springs (with the spoon in place). The action should be smooth. If there is any friction or metal on metal feel (second stage, after the cutter has 'cut') the spoon and cutter are probably coming in contact with each other. You can hold the machine up (front edge facing down) to the light and sight through the nozzle opening to get an idea of where the spoon might be coming into contact with the cutter. If the spoon has been scraping on the cutter face for awhile, you will see two linear scratches along the cutter face.
If the crimp on the spoon is tight and it looks like the spoon is contacting the cutter somewhere near the cutting edges, you can reshape the cutter with a chainsaw file. A good crimp is typically a bit ovoid with plenty of clearance in the middle of the cutter face. Contact between the spoons crimped area and the cutter is typically near the cutting edges. The Supermatic has a different spoon guide than the Supermatic II. Basically the spoon can rotate more with the Supermatic (especially over time) and the teeth on the spoon may contact the cutter near the edges. Both problems can be solved by filing the face of the cutter with a chainsaw file. The radius of the chainsaw file is just enough bigger that it will open up the arc of the cutting face and provide more clearance between the spoon and the cutter. To prevent the file from clogging run a piece of chalk over it or use a bit of dry lube on it.
...I'm not sure how much it matters but my preference is now to increase the slight retraction of the cutter, by shortening the linkage until the cutter is barely proud inside the nozzle, before resorting to filing the cutter face.
[ comment | link | top ]![]()
Linkage Binding
 There are a number of things that can cause the Supermatic's to feel rough or stiff in action. The first thing to check is how the machine operates without tobacco and without the springs or spoon. The action should feel smooth and easy.
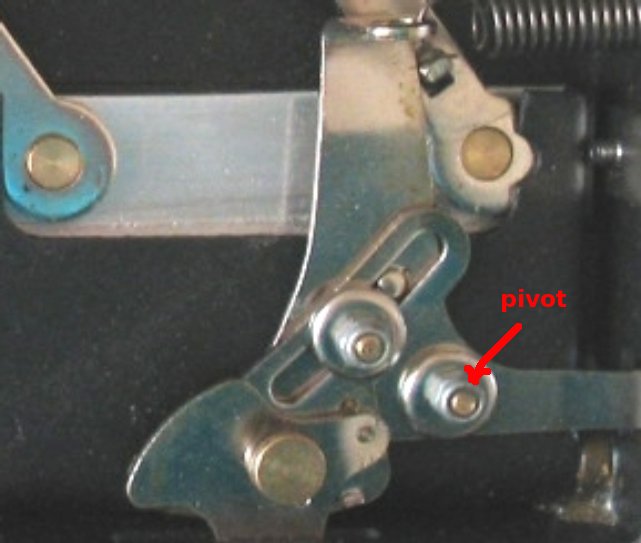
There are two distinct stages, the first is where the cutter compresses the tobacco. If you feel any bump/resistance when the cutter is 'cutting', there's likely build-up on the cutter bottom and you should clean it before proceeding. The second stage is where the spoon pushes the tobacco into the tube. There is a transition point (arrow #1) on the cam where the arm of the linkage is pushed against the machines body (arrow #2).
If the transition isn't smooth and the action is stiff/tight after the linkage touches the body, the linkage is binding (between the cam and body) and shortening the arm will smooth the action. Its a PITA because there is no way to know how much you need to file/grind off (I haven't tried filing with the machine assembled). Its good when there is just a wee bit of play, when the crossbar of the 'H' can barely move side to side.
There is an almost imperceptible retraction of the cutter, i.e. it compresses the tobacco and then backs off a hair. Taking too much material off the end of the arm could cause the cutter to back off too much. You can always stick a spacer between the body and arm if you take off too much. So long as you can see a bit of the side of the cutter showing inside the nozzle, you are fine. With the chamber closed take a toothpick, bamboo skewer, etc. and see if you can push the cutter behind the nozzle.
[ comment | link | top ]![]()
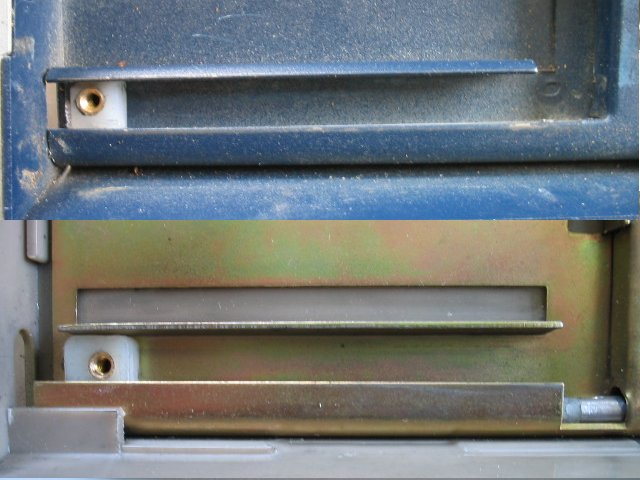
Spoon Bevels
 The Supermatic and Supermatic II spoon guides are different. The Supermatic has a curved lip along one edge and a larger gap near the tobacco chamber. If the mounting end of the spoon doesn't have adequate bevels it can hang up or bind when retracting. With the Supermatic II there is no need for bevels.
With the springs off, crank the machine until the cutter is fully extended, grab the end of the spoon linkage (the vertical tab near the mounting screw) and slide the spoon till it hits the tobacco chamber. Try retracting the spoon while pulling in various directions. If the spoon binds while retracting, if the side of the plastic tab drags on the curved lip, the top bevel needs to be increased. If the tab hangs up when entering the guide, you probably need to increase the end bevel.
[ comment | link | top ]![]()
Spoon Length
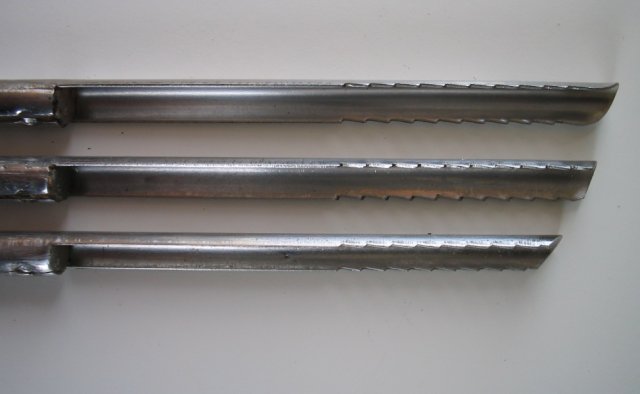 The stock spoon length is a bit longer than the inside length of most king size tubes and significantly longer than the inside length of the Rizla 'cigarette size' tubes.
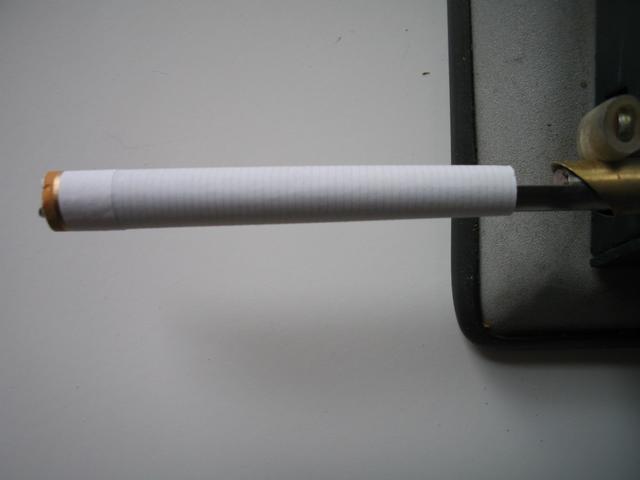
If the spoon is longer than the inside length of the tube, you will always have a bit of tobacco protruding from the end of the finished smoke. It doesn't matter how good your gripper grips, or how late your release timing is, when the spoon bumps/digs into the filter it will push the smoke off of the machine.
If the spoon is shorter than the inside length of the tube, its the tobacco (not the spoon) pushing/compressing against the filter that will force the tube of the machine. Without the spoon as a limiting factor, its the volume of tobacco - how much tobacco you pack into the slot/chamber (particularly on the left side) - that determines weather or not you have tobacco protruding from the end of the finished smoke.
A 60mm/2-3/8" long spoon will allow you to make flush tipped cigarettes with any tube currently on the market, 15-22mm filters/69-62mm inside length.
See also: Long Filtered Tubes
[ page | comments (4) - Sunday, 04-Mar-2007 | top ]![]()
Tube Gripper
 While the Tube Release Timing determines when the machine lets go of the tube, it can be overridden by a weak gripper. When the gripper isn't working well you will have filter end voids because the tube can slip off the machine prematurely, i.e. before the release engages.
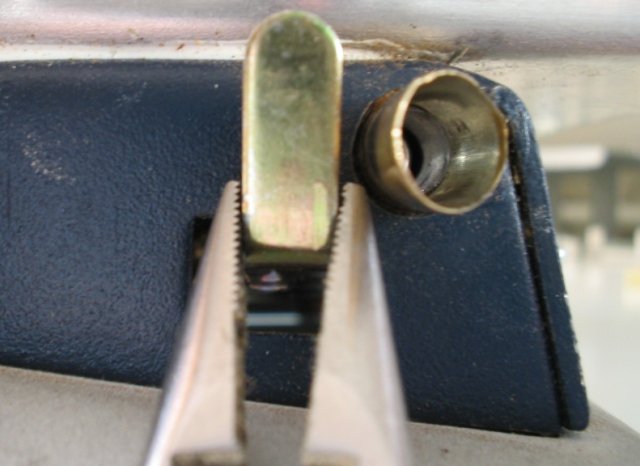
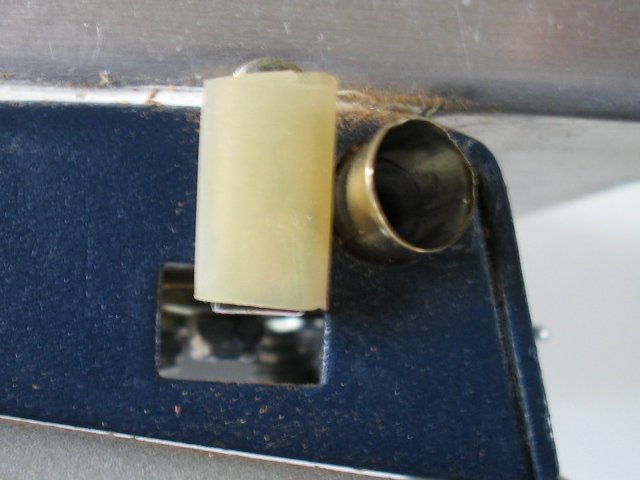
First check to see that the gripper is free to pivot. The pivot nut should be just loose enough to allow the gripper plate to move freely. Next check to see that the gripper will grip even when the rubber worn. Take the rubber cap off the gripper arm and crank the machine until the tobacco chamber is closed. There's probably a gap between the gripper arm and the tube nozzle. While a very small gap is fine, having no gap is good insurance. The easiest way to tighten the gap is to use pliers to lightly twist the gripper arm (when the tobacco chamber is open) clockwise until it will just touch the nozzle when the tobacco chamber is closed. You don't want to twist it too much or you won't have enough clearance to slide the tube on (open chamber). I'd previously shown how you could file the opening in the machine body, twisting the arm is better. When the gripper is working well check the tube release timing.
The gripper material and spring tension determine how well the machine holds onto the tube. I've used surgical rubber tubing on my gripper arm for years. Its got a bit more 'give' and is much more durable than the stock rubber cap. The drawback is that it requires a bit more spring tension. I've played with various ways to increase spring tension using the stock spring and shorter springs (the shorter Supermatic spring works well on the Supermatic II and TOM). While providing a slightly stronger grip, the effect is minimal and increasing the spring tension, more than a little, noticeably affects the smoothness of the action (when the griper plate and release tab, on the 'H' linkage, rub). My solution was the Adjustable Spring Tension and Roller Release mods.
If increasing the spring tension (after checking/adjusting the release timing) results in an occasional torn tube (an overly delayed release will also tear the tube when the gripper is gripping well), you know everything is setup well and any voids at the filter end are the result of not packing enough tobacco into the left side of the chamber or from using too much and/or overly moist tobacco. Overly dry tobacco falls in the too much tobacco category because its fragile and easy to over pack.
edited Dec '07
[ page | comments (1) - Monday, 12-Jul-2010 | top ]![]()
Tube Release Timing
 If you're getting a void at the filter end of the tube your machine may not be properly adjusted. My old Supermatic and Top-O-Matic worked great out of the box, my Supermatic II was seriously out of adjustment and my new Supermatic was releasing a little too early. Before adjusting the tube release timing, check the tube gripper.
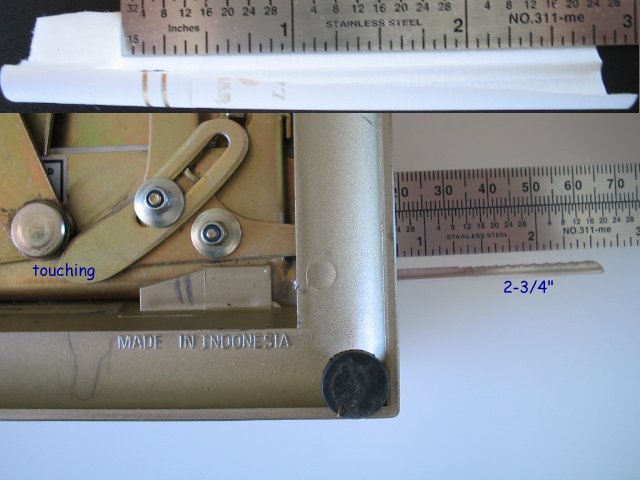
For King size smokes crank your machine until you feel it contact (no more) the tube release (you'll feel a bump near the end of the stroke). The measurement between spoon tip and machine body should be the same as (or a tad more than) the measurement of the spoon base to tip. When those measurements are equal, the machine will release the tube when the base of the spoon is flush with the machine body and the tip of the tube.
With a stock spoon the measurement is 2-3/4"/69mm, which is the same as the inside length of a tube with a 15mm filter. Since the gripper typically is not 100% (i.e. there is a bit of slippage), the measurement between spoon tip and machine body can usually be a bit longer than the spoon length.
When the measurement between spoon tip and machine body is shorter than the spoon, the machine will release the tube before the spoon base is flush with the tip of the tube and filter-end voids are a possibility (likely when using tubes with 15mm filters).
If you're getting torn tubes and the release measurement equals the spoon length, you probably have tobacco protruding from the tips (no filter end voids, its the tobacco - too much and/or too moist - in that case). This is most common with long filtered tubes. Using a shorter spoon and less tobacco (left end of the chamber) will give you better results than an earlier release.
A quick and easy thing to try, when using king size tubes, is to move the cigarette size setting to 100's. This delays the tube release timing and may help in reducing filter end voids. If your tubes are tearing (e.g. tubes with long filters), try the regular setting (earlier release).
[ page | comments (9) - Tuesday, 18-Sep-2012 | top ]![]()