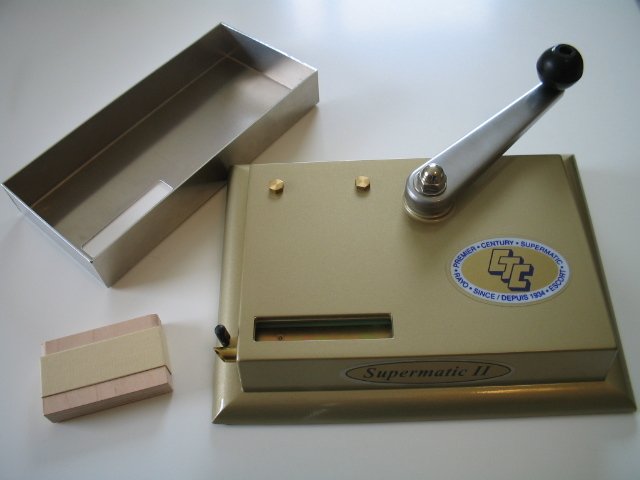
Hopper Tray
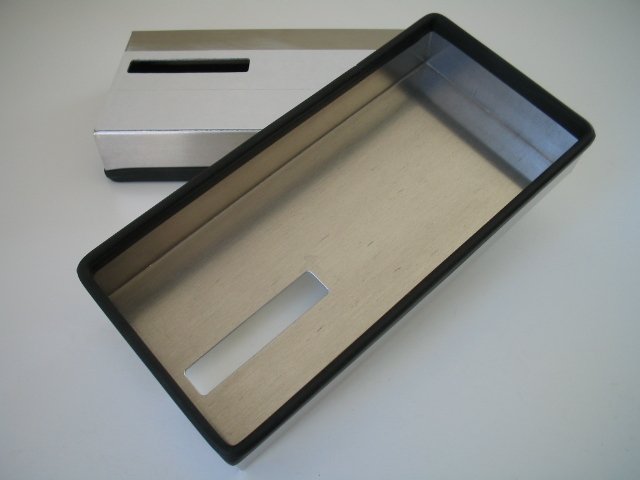 A handcrafted tray for Supermatic and Top-O-Matic machines. The tray is made from .05" aluminum sheet, has rubber trim and two sided tape for mounting. It measures 8-1/8" x 3-7/8" x 1-1/4" and when attached does not increase the Supermatic's overall dimensions.
The tray holds well over a packs worth of tobacco to simplify and speed cigarette production. The tray significantly reduces the mess associated with making cigarettes and makes the Supermatic much easier to hold on to. It also simplifies working with shags and can be used for blending. See the image gallery for examples (near bottom, or start here) ... or view the Pouches, Shag, and Blending image pages (3 images per page).
After using one of these trays for 8 months (see Stuffing Video) I decided to make a few more. I've now done a few small production runs and try to keep the trays in stock and ready to ship. All trays now come with an alignment tool to simplify installation. The price is $24.99 (8.3% tax for WA residents). Priority Mail shipping with delivery confirmation is $4.05 (US only). If you don't like it, return it undamaged and I'll refund your money.
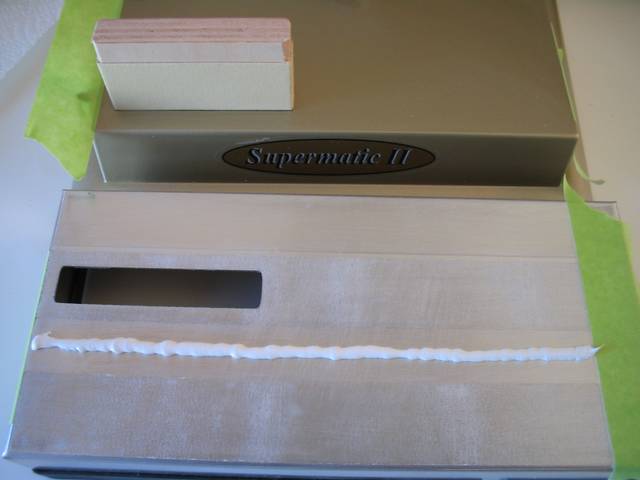
The 'Standard' tray mounts with two sided fiberglass tape, is easy to install and can last a long time (I had one in daily usage for 8 months before taking it off, mileage varies). The 'Glue Ready' tray is a, relatively simple, permanent mounting option that uses two sided tape and a bead of adhesive (not included).
Installation pictures/instructions start here.
May '07: I'm currently out of the trays and I'm really not sure when I'll make more, selling one per month makes them a low priority.
Comments [ new ]
- Re: Hopper Tray
- Posted by stephen bishop on Monday, 08-Nov-2010
do u still make the hopper trays i would love to buy one for my supermatic plz let me know my email is odie3423@gmail.com thanks
[ reply | link ] to this. Go to [ topic | top ]
- Re: Hopper Tray
- Posted by Maureen on Thursday, 20-Sep-2007
Do you have any hooper trays for sale now? If not when do you think you will be making any?
[ reply | link ] to this. Go to [ topic | top ]
thanks
maureen
- Re: Hopper Tray
- Posted by cheap & chippy chopper on Monday, 28-May-2007
[ reply | link ] to this. Go to [ topic | top ]
"May '07: I'm currently out of the trays and I'm really not sure when I'll make more, selling one per month makes them a low priority."
i am not going to cry. im not going to cry. im not NOT gonna cry I'm not I'm not....
- Hopper Tray
- Posted by Arnold Smith on Thursday, 07-Sep-2006
The Hopper Tray is a great improvement to the machine...So simple, yet so functional...almost like what the axle is to the wheel. I made my own from .025 aluminum and used gray "metal epoxy" to secure it. I was trying to save a buck by making my own but the materials alone put me back almost $20!....although, I have to say, I had a good time constructing it.
[ reply | link ] to this. Go to [ top ]
Other improvements I've made to my Top-o-matic include: A small amount of Weldwood Contact Cement applied to the bottom of the machine's metal edge and left to dry before putting the rubber mat back on...Now the mat fits much more securely than it did before.
I also replaced the heavy internal spring with a lighter and longer spring. It does the same job with much less effort...I wrapped both of the internal springs with small pieces of rubber taken from an artist's soft rubber eraser...Doing this stopped that "bonggg" sound that the springs can make...It made the machine sound a lot better and it doesn't interfere with the springs at all.(I know that must sound silly but it was getting on my nerves a little.:)
- The Hopper
- Posted by Jo on Saturday, 25-Feb-2006
I received Dave's hopper a few days ago. It looks very nice on the Supermatic. It is solid and well made.
[ reply | link ] to this. Go to [ top ]
I unscrewed the handle on the supermatic from the top, then reversed the plate so it would start from the far left and not hit the hopper.
The hopper was easy to put on. I stuck the wood block in the loading area, then took off the two strips of paper, slid it over the block of wood and pressed down and it was done...
The handle works better for me since it was moved. The plate didn't have a recessed area on the side I flipped over to, but it doesn't seem to matter so far. Does anyone know if it will matter or tear something up in the future? I read later that Dave has a plate for reversing the handle. I would have bought one if I had known that.
I hold onto the hopper but never pull against it when I crank the handle. I push down on the inside of the hopper with my left fingers with my left thumb against the front of the supermatic and pull the handle from the center back with my right thumb against the right bottom side of the supermatic at the same time. All of the pressure of pulling the handle is put on the supermatic not the hopper. The hopper is firmly fixed and very solid, but putting pressure on it would probably make it come off eventually. I guess it could be reglued or holes drilled and bradded onto the supermatic if that happens.
I dump all the tobacco I plan to use in the hopper and it saves a lot of time and mess not having to reach back in the can each time. It saves some of the mess too by keeping the tobacco confined. I don't know if stuffing will ever be totally mess free because there is tobacco that falls when you pack the cigarette and tobacco comes off the tube after filling.
Right now the supermatic is kept on the dining room table because my son in law uses it too. It sets on a large floor tile that matches a color in my table cloth. The tile is easy to brush off. I use a large make up brush to sweep the tobacco up like a broom. A place mat is under the tile. I cover the whole thing with a matching place mat when not in use. Classy huh? ha
- Re: The Hopper
- Posted by Kev on Saturday, 25-Feb-2006
When did you order yours? Today and a few weeks ago, it says he's out of stock.
[ reply | link ] to this. Go to [ top ]
- Re: The Hopper
- Posted by Dave L on Saturday, 25-Feb-2006
"The plate didn't have a recessed area on the side I flipped over to"
Have they changed something? What is the shape/depth of the recess? If its just a shallow round depression, its fine. So long as the rounded rectangle in the plate is mated with the flats on the crankshaft, its probably fine.
You have a 'glue ready' tray but didn't mention using any glue. The glue ready tray has tape that is more tenacious than the tape used on the standard tray. The same tape is not used on the standard tray because it doesn't have good shear/lateral resistance. Without glue, the glue ready tray can creep out of alignment with the machine.
If you didn't use glue I would leave it alone until it becomes a problem. The other reason I don't use that tape on the standard tray is because its a real PITA to remove the tray and the tape leaves gummy residue all over the tray and the machine. Its superior tenacity is only a good thing when it is used in conjunction with glue and for permanent mounting.
[ reply | link ] to this. Go to [ top ]
- Re: The Hopper
- Posted by Jo on Sunday, 26-Feb-2006
"Glue ready" to me, meant it was ready to stick on. Somewhere I had learned to expect double sided tape. I had looked at the picture where you used glue and masking tape earlier. I assumed that glue was for earlier hoppers. (You know what assume makes of u & me, don't you?)
[ reply | link ] to this. Go to [ top ]
The hopper still seems very tight and permanent.
My husband said he will drill a couple of holes thru the hopper and supermatic and put short screws in to hold them together. I would rather have bolts, but he thinks screws would work best. The screws or bolts would have to be very short to clear the inner works. Maybe you could consider giving people a choice of predrilled holes for the hopper.
- Re: The Hopper
- Posted by Dave L on Tuesday, 28-Feb-2006
There is no mechanical fastener that will last any longer than the suggested bead of polyurethane caulk. The thought of drilling holes and having bolt (or whatever) heads in the tray makes me cringe.
[ reply | link ] to this. Go to [ top ]
There's only a small area on the cutter side where something like an 8-24 machine screw (w/ lock-washer or nylock nut) would work and it would be in the way when removing the cutter/compressor bar.
I'd leave it alone. If it becomes a problem (the machine and tray slots creep out of alignment), you're welcome to send it back for new 'standard' or 'glue ready' tape (no charge).
- Re: The Hopper
- Posted by Jo on Sunday, 26-Feb-2006
About the handle (crank). I don't think they have changed anything.
[ reply | link ] to this. Go to [ top ]
I went back and looked at crank picture number 2 under modifications. It shows the light recess on the plate that I was talking about. It is flat on the other side. But it fits on just as tight and works just as good.
Can anyone tell me what type and size of drill bit we need to drill thru the hopper and the supermatic? I am saving the block of wood that came with the hopper to help hold it in place when we drill and in case I need to move the hopper later.
- Hopper Tray
- Posted by Denny on Saturday, 15-Oct-2005
Thanks Dave, I received my tray this morning, and this evening I made 3 packs of cigarettes with this hopper. Stress free no fuss no mess, I think this is the best thing since the supermatic invention. I won't say it makes my stuffing any faster, as I use my stuffing time as relax time, but I could easily see that it could. It really saves time from reaching into the bowl and stuffing into the cutter hole. This hopper will easily hold enough tobacco for 1 full pack of 100's, plus it makes cleanup minimal. You really have something here, now if we could convince you into making some brass, or stainless steel cutter/compression bars we would have the near perfect machine!
[ reply | link ] to this. Go to [ top ]
Denny
- Re: Hopper Tray - Follow Up
- Posted by David Wilson on Sunday, 09-Oct-2005
Well, I've had a few weeks to use one of Dave's permanent mounting 'Glue Ready' Hopper Trays.. Let me tell ya, It's an awesome addition to the Premier Supermatic.. I have a Supermatic II on order and will most definitely order a Hopper Tray for it as well.. This is a money well spent and to me a must have accessory, it looks good, its very well made and it makes the job of SYO so much easier and cleaner.. I used (Devcon Flow Mix 5 Minute Clear Epoxy) bought at Wal Mart includes two instant mix nozzles which allows the bead to be just the right size.. If done properly there will be no mess or clean-up necessary, I am very pleased on how this turned out.. The Tray is very secure and doesn't move at all! Thank's Again Dave....
[ reply | link ] to this. Go to [ top ]
- Hopper Tray
- Posted by David on Monday, 26-Sep-2005
Hello everyone, I received one of Dave's hopper trays a few days ago and would like to make a few comments.. First off the link to purchase the hopper tray couldn't be any easier.. The information posted was helpful and extremely useful.. I ordered the permanent mounting 'Glue Ready' tray (Works Very Well), it arrived in just a few days.. It is very well made, looks professional and fits like a glove.. I give it five *****'s and two thumbs up! I think Premier should buy one for every machine they build.. For me it makes the SYO experience so much easier and more pleasurable.. It all so improves on the clean-up as well, not as much tobacco floating around on everything :-) If anyone doubts buying one, don't.. You will be pleased from the ordering process to the pleasure and the ease of using it everyday.. Thank's Allot Dave.. I do Appreciate Ya..
[ reply | link ] to this. Go to [ top ]
- Hopper Tray
- Posted by Raymond Morris on Tuesday, 12-Jul-2005
This tray is a must have item. I have a supermatic and after using it with the tray for a week I would not own another one without the hopper tray. The craftmanship is great and install is a snap. I used the tape after cleaning with denatured alchol and removing the decals. The e-mail follow up (instructions) are great. Now if you would just make a cutter out of harder Aluminum. I stoned mine and all the "guts" and color case hardned the cutter=it keeps a edge longer. For the money the tray is steal.
[ reply | link ] to this. Go to [ top ]
- Re: Hopper Tray
- Posted by Dave L on Tuesday, 12-Jul-2005
How did you 'color case harden' the cutter? It sounds a bit like anodizing. Anodizing would be a good way to make the surfaces of the aluminum harder and more abrasion resistant.
[ reply | link ] to this. Go to [ top ]
- Re: Hopper Tray
- Posted by Raymond Morris on Tuesday, 12-Jul-2005
Try [link]
[ reply | link ] to this. Go to [ top ]
- Re: Hopper Tray
- Posted by Tim Aydt on Tuesday, 12-Jul-2005
Raymond, is this what you used to color harden the aluminum? It was my understanding that this would only harden steel, plus the aluminum would melt at that tempurature.
[ reply | link ] to this. Go to [ top ]
Anodizing aluminum requires an eletric current and special chemicals. Other chemicals are required to color it.
- Re: Hopper Tray
- Posted by Raymond Morris on Sunday, 17-Jul-2005
I used the crucible in a kiln,after 5 minutes removed it. The company used to sell a paste and you heated it with a propane torch to get hot and the color. It hardned the surface of the metal(only .002-.003"),I wish the would sell it again. The "color case" harden I gave mine=color is gone,still a little harder,but not much. Fixing to try parking' the cutter and see how it works. If not will do a heat and quinch and see what happens. I have found that all the parts are soft (like working on a auto-ordance and/or old S.A.etc 1911-a1=replace the 'guts' keep frame and slide=good gun). As their are no after market 'upgrade's' for this machine we have to make do.
[ reply | link ] to this. Go to [ top ]
- Re: Hopper Tray
- Posted by Dave L on Monday, 25-Jul-2005
If anyone is feeling adventurous, there's a lot of 'anodizing at home' HowTo's online. Here is one with a collection of links to get you started. A Google search for anodizing will turn up a bunch more.
[ reply | link ] to this. Go to [ top ]
- Re: Hopper Tray
- Posted by Jo on Saturday, 28-Jan-2006
You can brush vinegar on aluminum and it makes it paintable. It doesn't peel. I don't know if it hardens it or not.
[ reply | link ] to this. Go to [ top ]
- Re: Hopper Tray
- Posted by Rick on Tuesday, 28-Jun-2005
I purchased one of Daves world-famous hopper trays for my Supermatic II recently. I used the double-sticky tape included for installation. (It took a few days to get used to it) As Dave warned, some installs last a long time and others don't. Well, mine stayed on but tended to creep due to the torque of turning the crank while holding the machine by the tray with my left hand. I knew it would be a matter of time.
[ reply | link ] to this. Go to [ top ]
I ended up re-securing my tray with pop-rivets. I drilled from the underside making sure the rivets were located in as clear of a location as possible. Once in, I had to flatten one rivet with a punch to make sure it cleared the mechanism as it actuated. And yes, I made really sure it was on straight before I drilled the holes.
The tray is very solid now, still has no rough edges, and is permanent.
Nice Job on the tray Dave, and Kudos on your customer service and participation in this site.
- Re: Hopper Tray
- Posted by Dave L on Wednesday, 29-Jun-2005
I recommend this method for permanent mounting. Using polyurethane caulk will give you a rock solid and truly permanent mounting. I'd worry about rivets loosening up over time due to lateral forces and the rivets relatively small surface area.
[ reply | link ] to this. Go to [ top ]
- Dave's Hopper Tray
- Posted by syo_turf on Wednesday, 13-Apr-2005
[ reply | link ] to this. Go to [ top ]
I got one of Dave's hopper trays and am *very* pleased. It greatly speeds up production and eliminates the mess, plus the workmanship is excellent. The included alignment block made installation a snap. I cleaned the surface of the machine well with grain alcohol (the safest solvent) first to ensure a good bond.
Although I had my Premier less than a week and despite lubricating it, the mechanism was already a bit rough with a hitch that often required a handle jiggle to get it to back off when the cutter plate started to open after the injection. Looking at the mechanism on the underside, I could not for the life of me figure out what was getting stuck, but if I lifted on the handle when backing off, it did not occur. I never press down on the handle when stuffing. However, when I reversed the handle as required for tray installation, the action became much smoother and the hitch did not occur. I also cannot figure out why this is so, but I am cranking away now!
I highly recommend Dave's Super(matic) Hopper Tray.
- Re: Dave's Hopper Tray
- Posted by syot on Saturday, 23-Apr-2005
I figured out what was causing the hitch. It was the buildup of residue on the cutter blade making it sticky on the return. It did not occur for a while after the installation since when I was cleaning off the top in prep for installing the tray, I also cleaned off the blade with the alcohol. Now, whenever it gets sticky on the return, I just rub the cutter with a fingernail to clean off the residue and there are no problems.
[ reply | link ] to this. Go to [ top ]
- Re: Dave's Hopper Tray
- Posted by Kev on Saturday, 23-Apr-2005
I can't do a carton before I have to disassemble and clean the bottom of the cutter. My Premier has always required constant cleaning. Since switching back to king size I use an Excel for stuffing. While it's 100% plastic, I've stuffed several cartons without any problems. I know one day I'll overstuff and break something but at least I don't have the constant cleaning right now.
[ reply | link ] to this. Go to [ top ]
- Re: Dave's Hopper Tray
- Posted by Tim Aydt on Sunday, 24-Apr-2005
Try sifting out the powdery tobacco. I use a screen-wire colander to sift mine, and only have to disassemble to clean my supermatic every other month or so.
[ reply | link ] to this. Go to [ top ]
- Re: Dave's Hopper Tray
- Posted by syot on Friday, 27-May-2005
Does the Supermatic II require less cleaning? I have also found that I need to clean the plate on the bottom of my Premier often, and keep the cutter very clean, so it works well. I described in an earlier post that I had to dry tobacco to 50% RH or less before stuffing or it was a difficult job. The Excel is much more forgiving of the moisture content since it does not get gummed up like the Premier.
[ reply | link ] to this. Go to [ top ]
The only problem I have with the Excel, besides the lack of Dave's hopper tray and only being able to hold a small amount of tobacco, is the nozzle size and the way it is hidden. I rarely throw away papers when using the Premier but with any but the most perfect papers carefully placed on the Excel nozzle, I have to throw away over 20%. I tried sanding the nozzle to make it a bit smaller but there is not much material to work with. It seems like it would be easy enough to use a slightly thinner nozzle given the good grip of the retainer.
I like the "single action" crank of the Excel, too, which I assume the Supermatic II also uses. But, does the II require as much cleaning as the Premier?
- Re: Dave's Hopper Tray
- Posted by Kev on Friday, 27-May-2005
What's the issue with the Excel causing 20% waste of tubes? Are you saying the tubes are too tight to fit? I agree the hidden nozzle is not a positive. I twist my tubes when putting them on the nozzle and might throw away 1 tube per carton. I've used Gizeh Charbon, Gizeh Filter Tips, Mascotte & Twister tubes with the same results.
[ reply | link ] to this. Go to [ top ]
- Re: Dave's Hopper Tray
- Posted by Dave L on Friday, 03-Jun-2005
In my experience the Supermatic II requires less maintenance. I've had my II for over 1-1/2 years and have yet to disassemble it (I've had my Premier apart numerous times). Its my thought that the single piece mounting plate of the II makes for a more accurate/consistent product. It could be that I got a 'bad' Premier. I also had a years more experience when I got the II.
[ reply | link ] to this. Go to [ top ]
The actions of the two machines are basically the same (see the Premier Image Gallery). The difference between the two machines is in how the actions are mounted/housed.
- Re: Dave's Hopper Tray
- Posted by Kev on Friday, 02-Jun-2006
An update...I'm on my second Premier machine and it only requires cleaning about once every six months. I'll write-off the first one to "user error" when learning how to stuff. I have been able to stuff faster on my Excel until recently. I joined the hopper club several weeks ago. Since I can now dump almost a pack of tobacco into the tray, I can stuff faster on the Premier. It did take just a few days to get comfortable with the handle position.
[ reply | link ] to this. Go to [ top ]
- Re: Dave's Hopper Tray
- Posted by Jitterbug050 on Wednesday, 12-Oct-2005
What I did for the sticking cutter is first put a piece of 400 grit sandpaper on a flat surface [table with Formica, piece of glass is better. like lapping in a CPU and the cooler, if you are in to making very high performance computers] and press the cutter down and lightly push it in a circle pattern.[until the low spots are gone] Then I went to 600 grit, then 1000, and for a finish I used my 10 inch polisher I use to polish aluminum parts, and got it to a mirror finish. Careful to just take the high/low spots out when using the sandpaper. If you remove too much it will make matters worse. I also rolled the edges and corners a touch.
[ reply | link ] to this. Go to [ top ]
It has not jammed in five months, and I make 2-3 cartons of 100's a week.
To really do it right I would polish it after making sure it is flat, then have it hard anodized. This way the sand would not scratch and gouge the aluminum. The sand gets embedded in the aluminum and jams it up. Too wet & too much is something you learn along the way that jams them up as well.
I might hard coat a few and see how it works. Maybe go nuts and make some billet parts. If they used a different grade aluminum they would not have this problem. It would be harder on their cutting tools and the material would be a little more.
If it was my company, I would charge a buck or two more and have the better part to keep people off my back for a common problem. The better & easier you make it to use [and less problems] the more people will start making their own smokes. If a neighbor asks how you like the machine and you tell him it jams once in a while, you just lost a lot more than one convert. If it sounds like something you have to screw with too much, they won't even try it.
In my house we save $250 a month. That is not hard to sell someone on, and they taste better, last longer. [don't get too excited, the gasoline station and the home heating gas will be glad to take that $250]
- Re: Dave's Hopper Tray
- Posted by Jderringer on Saturday, 03-Jun-2006
Hell! I'd give my left arm for a brass or hardend aluminum billet cutter! I think brass might be better due to it's hardness and self lubricating properties. post if you "go nuts" and run some!
[ reply | link ] to this. Go to [ top ]
- Re: Dave's Hopper Tray
-
 Posted by Dave L on Tuesday, 06-Jun-2006
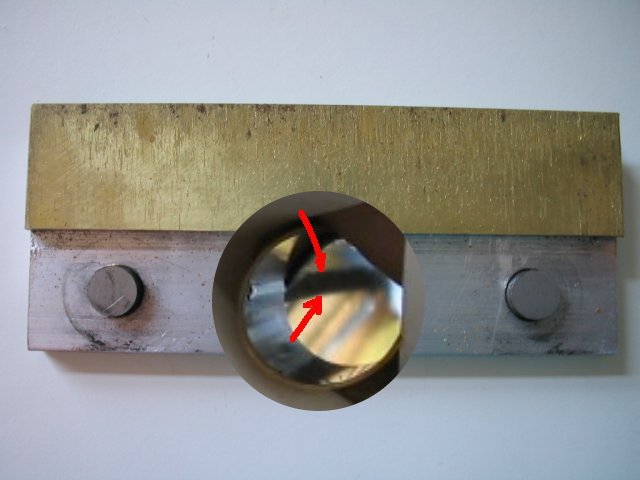
I've been using a cutter/compressor with brass shim-stock laminated to the bottom for a while now. While the brass still gets scratched up, its less prone to getting gummed up. It wasn't until I started using it that gunk buildup at the front/top of the tobacco chamber became the primary issue. The picture is the cutter and chamber top in a machine that was still working fine (i.e. not enough buildup to be an issue yet). You can see that buildup is occurring mostly at the front/top of the chamber (looking through the nozzle, machine tilted back ~45deg).
[ reply | link ] to this. Go to [ top ]
- Re: Dave's Hopper Tray
- Posted by Jderringer on Tuesday, 06-Jun-2006
How did you laminate the brass to the aluminum? epoxy? How thick is the stock? did you have to sand much off the bottom?
[ reply | link ] to this. Go to [ top ]
- Re: Dave's Hopper Tray
- Posted by Dave L on Tuesday, 06-Jun-2006
Epoxy and .005 shim-stock. The sanding's not too bad and the posts don't get shortened too much.
[ reply | link ] to this. Go to [ top ]
There's other aspects like how well the cutter and chamber bottom surfaces mate (improving that had more effect than the brass) and what is the ideal cutter to chamber clearance (cutting edge when closed, no opinion yet, currently .002).
- Re: Hopper Tray
- Posted by David on Friday, 01-Apr-2005
Cool tray. Speeds stuffing and cuts down on the mess a lot.
[ reply | link ] to this. Go to [ top ]
- Re: Hopper Tray
- Posted by Bobzarry on Tuesday, 14-Dec-2004
I am sure over the years many have found ways of making life easier. I am very new to this all. I have the supermatic premier that I received last week and have only just made my first 2 cartons of smokes. While looking through this site I saw that someone had made a hopper they offer for sale. I also saw it was out of stock, so I decided to make my own. I used a "critter cage" this is just a small plastic tank with perforated lid sold in pet shops and used to hold things like frogs or Betta's (fighting fish). I was able to cut an opening on the bottom of the tank to the same size as the opening where you load your tobacco on the supermatic. I then drilled holes in the supermatic and the tank to match. I used screws, nuts and washers to secure the tank to the Supermatic. The hopper easily holds enough tobacco for 2 packs of cigs. The tank is on very securely and beiing transparent makes it easy to work with. Of course this makes for less mess then loading up for each cig. On the first day i made cigs I had enough tobacco on the table and floor for a few more cigs by the time I was done.....LOL
[ reply | link ] to this. Go to [ top ]
- Re: Hopper Tray
- Posted by Jennifer on Tuesday, 28-Sep-2004
that tray is a great idea. Due to monitary constraints I ended up making my own tray from a bread pan I got for 99 cents at a thrift shop. It dosen't hold as much tobacco as I would like, but its much better than without it. I think every supermatic owner should have a hopper tray. Flipping the crank plate and adding a hopper tray has made things SO much better.
[ reply | link ] to this. Go to [ top ]
- Re: Hopper Tray
- Posted by Kurt Wall on Sunday, 10-Oct-2004
I found the qualify of the materials and workmanship justified the price. But I can understand it might be steep price others. I easily save $25/carton, so the trade-off is worth it over here.
[ reply | link ] to this. Go to [ top ]
- Re: Hopper Tray
- Posted by Jennifer on Saturday, 23-Oct-2004
Now that I have some more money at my disposal I am concidering buying a tray. The ones you make are far nicer than the mine, and bigger too.
[ reply | link ] to this. Go to [ top ]
- Get One of These!
- Posted by Kurt Wall on Sunday, 18-Jul-2004
As a proud owner of one of these trays, permit me to encourage everyone to get one. They reduce the mess and make it much faster to stuff a pack of smokes. I had flipped the crank plate under the handle over to change the crank path, which made it much easier to hold the machine. With the addition of Dave's custom hopper, it is even easier to hold the machine steady. The workmanship is very good, too, as there are no sharp edges, everything is aligned and true, and it just plain looks nice. I took the decals off my Supermatic before attaching the hopper, resulting in better adhesion of the cloth tape and a cleaner look to the machine as a whole.
[ reply | link ] to this. Go to [ top ]
You gotta get one of these!
- Re: Get One of These!
- Posted by Kev on Saturday, 06-May-2006
I finally ordered one this past week. Neat! I always liked the idea that my Excel has a small scooped area for tobacco w/o making a mess. Now my Supermatic has a much larger tray!
[ reply | link ] to this. Go to [ top ]
- Re: Hopper Tray
- Posted by Kurt Wall on Friday, 02-Jul-2004
I was just about to order on of these. Based on the listed dimensions, though, I don't think it will fit on the Premier Supermatic because the crank on Big Blue appears to be placed further into to the housing than it is on the Supermatic: the edge of the heavy plastic washer/bushing for the crank sits about 2mm (3/4") from the edge of the blue housing. :-(
[ reply | link ] to this. Go to [ top ]
- Re: Hopper Tray
- Posted by Dave L on Friday, 02-Jul-2004
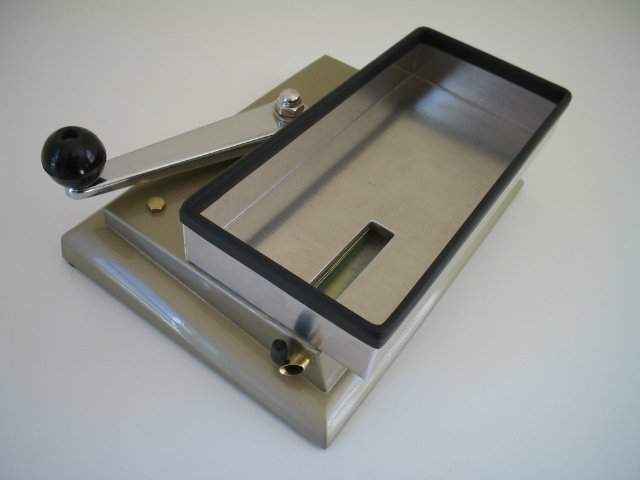
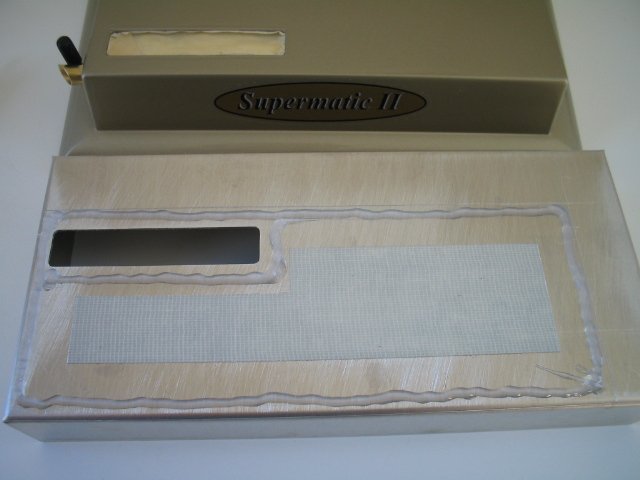
Take a look at the 'attached' or 'next' image. The front of the tray overhangs the top ~1" and lines up w/ the front of the base. There's ~1/4" clearance (on both machines) between the bushing/crank and tray.
[ reply | link ] to this. Go to [ top ]
- Re: Hopper Tray
- Posted by Kurt Wall on Monday, 05-Jul-2004
Ah. Well, then, look for an order sometime this week.
[ reply | link ] to this. Go to [ top ]
Kurt